Workday Financials ERP
This article refers to a feature that might not be available in your current Brex plan. If you'd like to learn more about this feature and how to unlock additional capabilities in Brex's upgraded plans, please have your account or card admin reach out to Brex Support by clicking on Support in your dashboard.
Overview
Brex's integration with Workday Financials streamlines financial data management by providing real-time visibility, easy customization, and efficient management of fields and workflows. The integration allows you to control spend, export financial data, and automate the import of your chart of accounts. Mapping rules help auto-categorize transactions, simplifying the financial management process. This comprehensive guide walks you through setting up the integration, whether you're a current Workday Financials user or considering it as a future option. Follow the steps below to set up your Workday Financials integration. If you need assistance, please contact your Brex representative.
Integration System Security Group (ISSG)
Create an ISSG
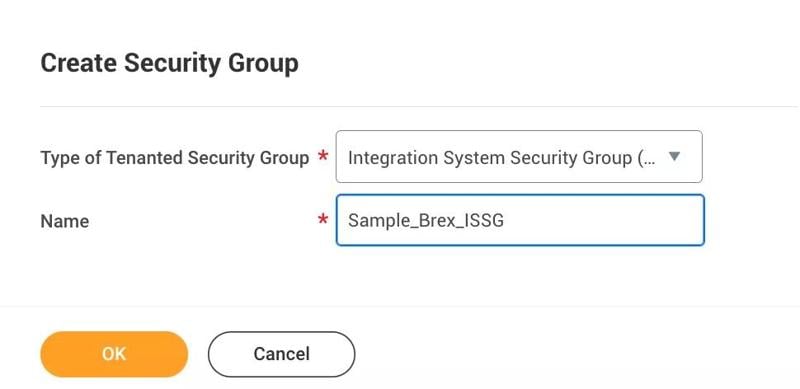
Step 1: Type “create security group” in the Workday search bar and click Create Security Group. Step 2: From Type of Tenanted Security Group, select Integration System Security Group (Unconstrained) and give the group a name like “Sample_Brex_ISSG”. Click Ok.
Step 3: On the next screen, under Integration System Users, add the ISU you created in Step 1 to the list. Click OK, and then Done.
Integration System User (ISU)
Create an ISU
Step 1: Type “Create Integration System User” in the Workday search bar and select the task.
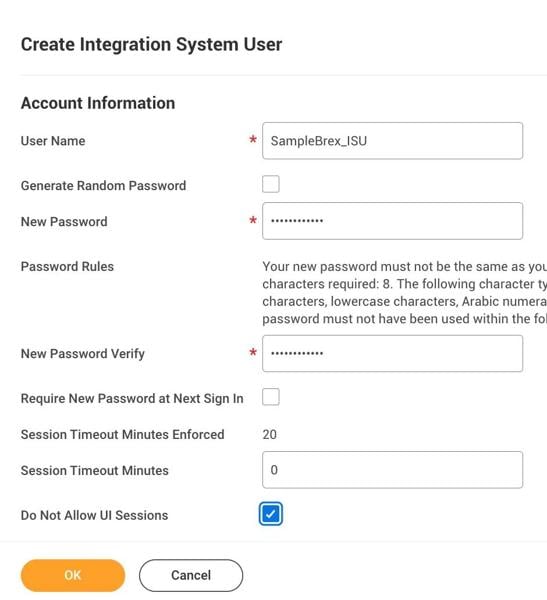
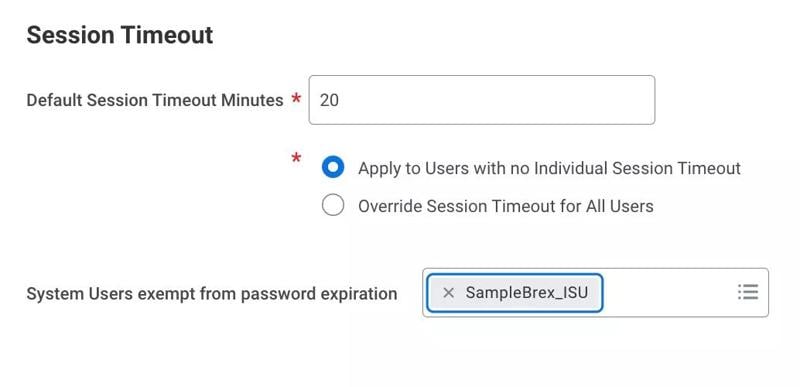
Step 2: Enter a new username and password in accordance with your rules. Note: Keep the Session Timeout Minutes default value of 0 to prevent session expiration. An expired session can cause the integration to time out before it successfully completes. Step 3: Select Do Not Allow UI Sessions if you want to prevent the integration system user from signing in to Workday through the UI. Step 4: To avoid integration errors caused by expired passwords, search for the Maintain Password Rules task and add the integration system user to the System Users exempt from password expiration field.
Assign to ISSG
Step 1: Create your ISSG, following the instructions above. Step 2: On the next screen, under Integration System Users, add your ISU to the list. Step 3: Click OK, and then Done.
Configure domain security policy permissions
Now you can ensure that the ISSG has access to the necessary business domains. In the Security Group, edit the Domain Security Policy Permissions and add the following GET ONLY operations:
- Worker Data: Current Staffing Information
- Worker Data: Public Worker Reports
- Worker Data: Personal Data
To do this, follow these steps. Step 1: Type “View Security Group” in the Workday search bar, select your newly created ISSG, and click OK. Step 2: On the next page, click the ellipsis icon after the Security Group name and select Tenanted Security Group > Copy.
Step 3: Select Maintain to be added to the specified business domains listed above.
Step 4: Add the necessary domains by selecting “+”.
Step 5: After you’ve added all of the necessary domains, activate the security policy changes by typing “Activate Pending Security Policy Changes” in the Workday search bar and selecting the result. Step 6: Enter a comment (e.g., “Brex implementation”), then click OK to activate.
Step 7: Check the Confirm checkbox verifying the changes that need to be activated.
Manage authentication policies
Step 1: In production, add the ISU security group to the authentication policy in Workday to allow for access. Step 2: Type “Manage Authentication Policies” and select the correct environment.
Step 3: Add the ISSG that was created to the necessary group (this will vary depending on your setup). Click Done.
Step 4: Activate your policy changes after you make the change, located on the Manage Authentication Policies screen. Step 5: Select Activate All Authentication Policies, add the comment, and click OK. Check the Confirm checkbox to activate.
Obtain the web services endpoints for the Workday tenant
You can find your Workday HR endpoints by following the steps below. Step 1: Search for and open Public Web Services in Workday. Step 2: Hover over Human resources and click the three dots to access the menu Step 3: Click Web Services > View WSDL. Step 4: At the bottom of the following page, find the host, which will look something like this:
Note: Endpoints differ across tenants, so please provide us with endpoints for each testing environment.
Setup accounting integration
After you’ve created and assigned an ISU using the guide above, an account, card admin or any other users with the specific product capability can set up the Workday accounting integration. Step 1: Configure your domain security policy permissions by typing “View security group,” into the Workday search bar, selecting your newly created ISSG, and clicking OK. Step 2: On the next page, click the ellipsis after the Security Group name and select Tenanted Security Group > Copy.
Step 3: Toggle Maintain to be added to the specified business domains listed above and add the necessary domains by clicking the +.
You can find the necessary domains in this table:
| Operation | Domain Security Policy | Domain Security Policies Inheriting Permission | Functional Areas |
|---|---|---|---|
| Get Only | Manage: Organization Integration | Organizations and Roles | |
| Get and Put | Integration Build | Integration | |
| Get Only | Reports: Customer | Customers | |
| Get Only | Set Up: Company General | Common Financial Management | |
| Get Only | Set Up: Project Tracking | Project Tracking | |
| Get Only | Set Up: Basic Customer Worktag | Common Financial Management and Worktags | |
| Get Only | Set Up: Basic Project Worktag | Common Financial Management and Worktags | |
| Get Only | Set Up: Basic Revenue Category Worktag | Common Financial Management and Worktags | |
| Get Only | Set Up: Basic Supplier Worktag | Common Financial Management and Worktags | |
| Get Only | Set Up: Maintain Custom Worktags | Common Financial Management and Worktags | |
| Get Only | Process: Journals (NEW) | Process: Journals - View | Financial Accounting |
| Get Only | Set Up: Spend Categories | Common Financial Management | |
| Get Only | Create: Cost Center | Organizations and Roles | |
| Get Only | Worker Data: Public Worker Reports | Staffing | |
| Get Only | Manage: Location | Location: View | Organizations and Roles |
| Get Only | Set Up: Accounts | Common Financial Management | |
| Get Only | Reports: Supplier | Suppliers | |
| View and Modify | Integration Configure | Integration | |
| View and Modify | Integration Build | Integration | |
| View Only | Worker Data: Current Staffing Information | Staffing | |
| View Only | Worker Data: Active and Terminated Workers | Staffing | |
| View Only | Worker Data: Workers | Staffing | |
| View Only | Worker Data: Benefit Elections | Benefits and Personal Data | |
| View Only | Worker Data: Worker ID | Personal Data | |
| Get Only | Worker Data: Current Staffing Information | Staffing | |
| Get Only | Worker Data: Active and Terminated Workers | Staffing | |
| Get Only | Worker Data: Workers | Staffing | |
| View and Modify | Set up: Worktags | Set Up: Worktags - Business Unit | Common Financial Management and Worktags |
| Get and Put | Set up: Worktags | Set Up: Worktags - Business Unit | Common Financial Management and Worktags |
| Get Only | Staffing Organizations: Business Unit | Staffing | |
| [Optional] Get Only | Set Up: Fund Accounting |
| Common Financial Management |
Step 4: Search for Business Process Security Policies for Functional Area, then fill in the values below. Step 5: Edit the policy and add the ISSG to the Import Accounting Journal (WS Background Process) action.
Step 6: Type “Activate Pending Security Policy Changes” in the Workday search bar and click the result. Step 7: Enter a comment (e.g., “Brex implementation”), then click OK to activate.
Step 8: Check the Confirm checkbox verifying the changes that need to be activated. Step 9: Search for Maintain Journal Sources and add Brex. You don’t need to checkmark In Use.
Step 10: Click the magnifying glass to edit the journal source, then change the reference ID to “Brex.”
Disconnect Workday Financials
Step 1: Click your name in the top right of your dashboard, and go to Integrations. Step 2: Next to Workday Financials, click the three dots, and choose Disconnect. Disconnecting will not remove any mapping rules previously created, in case you’d like to reconnect Workday Financials with the same sign-in credentials at a later time.